Floor Sander Sheets are abrasive attachments designed to smooth, prepare, or refinish wooden and other suitable floor surfaces. They usually combine a durable backing material with abrasive grains, such as aluminum oxide or silicon carbide. The grit size controls the sanding effect. Coarse sheets remove old finishes and uneven patches, while finer sheets create a smoother surface before staining or sealing.
Their operation is straightforward. A floor sander presses the sheet against the floor and moves it across the surface. The abrasive grains cut away tiny layers of material, much like hundreds of miniature blades. Pressure, machine speed, floor condition, and grit selection all affect the final result. A sheet that looks clean may already be worn. It can still leave dull marks or uneven scratches.
In practical floor preparation, choosing the right sheet matters as much as choosing the machine. Start with the floor manufacturer’s guidance and inspect a small, hidden area. This simple test can reveal whether the grit is too aggressive. It may also expose loose boards, old adhesive, or hidden damage. Many beginners focus only on grit numbers, but backing quality and dust removal also influence performance. A clogged sheet loses cutting power quickly. Keep the work area ventilated, wear suitable eye and respiratory protection, and follow the sander’s operating instructions. Results can vary, even with identical products. That uncertainty deserves attention. A careful sanding plan usually prevents deeper scratches, wasted sheets, and costly repairs.
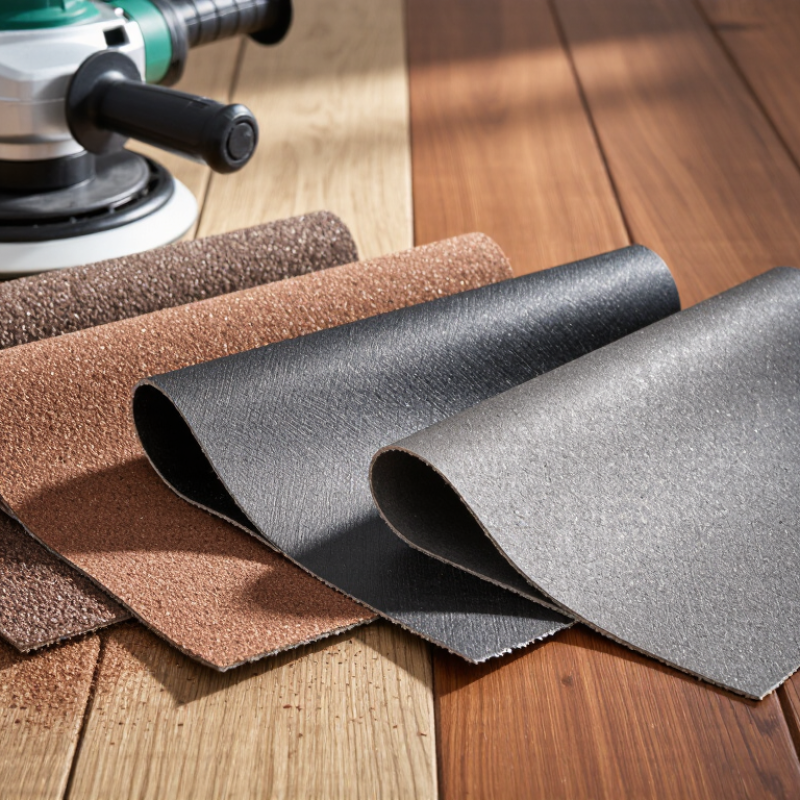
Floor sander sheets combine abrasive minerals, backing, and machine-specific dimensions. The mineral removes finish and levels wood. Aluminum oxide is durable and versatile. Silicon carbide cuts sharply but wears faster. Ceramic alumina removes material aggressively, especially on hard coatings. Garnet feels gentler, though it may load quickly.
FEPA grading data uses P-numbers to classify abrasive particle size. Lower numbers, such as P24 or P36, cut deeply. Higher numbers, such as P100 or P120, refine the surface. NWFA technical guidance commonly recommends progressing through grits instead of skipping several grades. A typical sequence might move from P36 to P60, then P80 and P100. However, wood species and coating thickness change the result. I have found that “standard” sequences sometimes need adjustment. That is where practical judgment matters.
Backing controls flexibility and tear resistance. Paper sheets feel predictable, while cloth-backed products tolerate heavier pressure. Common floor sheets measure around 8 x 19 inches, 12 x 18 inches, or 7 x 14 inches. Always match the sheet to the platen. A loose edge can leave visible scratches. An undersized sheet may waste abrasive area.
Tips: Check the grit pattern under angled light. Replace clogged sheets early. Excess pressure creates heat, not better sanding. Test one small area first. A short pause can prevent a long repair.
Floor sander sheets are abrasive sheets designed to remove finish, scratches, and uneven wood fibers. They attach to sanding machines or sanding blocks. Their performance depends heavily on grit rating, not just the machine’s power.
FEPA P-grades use numbers to describe abrasive particle size. Lower numbers, such as P24 or P36, indicate coarse grains for removing thick coatings or damaged surfaces. Medium grades, including P60 and P80, help erase deep sanding marks. Higher grades, such as P120 or P150, create a smoother surface before coating. The number rises as the abrasive becomes finer.
ANSI B74.18 provides another reference for abrasive grain sizing, mainly used in the United States. Its classifications may not match FEPA P-grades exactly. A P80 sheet should not be treated as automatically identical to an ANSI-rated sheet. Check the supplier’s conversion chart.
Small differences matter.
In practical work, I test one sheet on a hidden floor area first. Coarse grit can remove finish quickly, but it may leave grooves that finer sheets cannot fully erase. Fine grit feels safer, yet it can clog when old varnish softens from heat. Dust, wood species, pressure, and sanding direction also change the result. Standards improve consistency, but they do not replace inspection. I have found that stopping to examine the floor often prevents another unnecessary sanding pass.
| Data Dimension | What It Means | Typical Floor-Sanding Application | Technical Notes |
|---|---|---|---|
| Floor sander sheet | A flexible abrasive sheet or pre-cut abrasive panel used with a sanding block, orbital sander, edging sander, or other floor-sanding equipment. | Removing coatings, flattening uneven areas, smoothing wood flooring, or preparing a surface for finishing. | The sheet normally consists of a backing, an adhesive layer, abrasive grains, and sometimes an additional size or top coating. |
| Abrasive backing | The paper, cloth, fiber, film, or combination substrate that supports the abrasive grains. | Paper is common for general sheet sanding; cloth or reinforced backings are useful where greater tear resistance and flexibility are needed. | A heavier backing generally resists tearing, while a lighter or more flexible backing can conform more easily to edges and profiles. |
| Abrasive grain | The hard mineral particles that cut or abrade the surface. | The grain removes old finish, wood fibers, scratches, and small surface irregularities. | Common abrasive minerals include aluminum oxide, silicon carbide, ceramic alumina, and garnet; performance depends on grain shape, hardness, fracture behavior, and bonding. |
| Open-coat or closed-coat construction | Describes how densely the abrasive grains cover the backing. | Open coat can help reduce loading when sanding resinous wood or some finishes; closed coat provides more cutting points for uniform stock removal. | Loading occurs when dust, finish, or softened material fills the spaces between grains and reduces cutting efficiency. |
| FEPA P-grade system | A European grading system for coated abrasives. The letter “P” identifies the FEPA coated-abrasive grading designation. | Used to specify the relative coarseness or fineness of sheets, discs, belts, and other coated abrasives. | A smaller P-number is generally coarser; a larger P-number is generally finer. The designation is based on defined particle-size distributions rather than a simple visual label. |
| ANSI B74.18 / ANSI-CAMI grading | A U.S. abrasive-grit classification framework associated with coated abrasives and particle-size designation. | Used on products labeled with U.S. or CAMI-style grit numbers, particularly where purchasing specifications use ANSI terminology. | ANSI/CAMI numbers and FEPA P-grades are related but not identical; the same nominal number does not automatically indicate the same particle-size distribution. |
| Coarse: P16–P36 | Very aggressive abrasive range for rapid material removal. | Removing thick finish, paint, adhesive residue, severe wear, or local high spots; often used with caution on wood floors. | Leaves deep scratches and should normally be followed by progressively finer grades. Excessive pressure can create gouges and uneven areas. |
| Medium-coarse: P40–P60 | Balances stock removal with improved scratch control. | Initial sanding of worn wood floors after the most aggressive defects have been addressed. | The correct starting grade depends on finish thickness, floor flatness, wood species, and the sanding machine. |
| Medium: P80–P100 | Removes the previous coarse-sanding scratches while continuing to level the surface. | Intermediate sanding of wood flooring and preparation for fine sanding. | Changing direction or using adequate dust extraction helps reveal remaining scratches and low areas. |
| Fine: P120–P150 | Produces a smoother surface with substantially smaller visible scratches. | Final preparation before many floor coatings, subject to the coating manufacturer’s requirements. | Sanding too finely can reduce coating adhesion on some systems by making the surface less mechanically receptive. |
| Very fine: P180–P240 and above | Creates a refined finish with low surface roughness. | Light finishing, between-coat abrasion, detail work, or preparation for specific surface treatments. | Very fine grades remove less material and can clog more quickly when used on soft finishes or uncured coatings. |
| Typical progression | A sequence of increasingly fine grits used to replace the scratches made by the preceding grade. | Example sequence: P36 → P60 → P80 → P100 or P120, adjusted for the floor condition and finish system. | Skipping too many grades can leave deep scratches; using unnecessary intermediate grades increases labor and abrasive consumption. |
| Cutting action | The abrasive grains penetrate the surface and shear or fracture small particles away. | Removes material through repeated contact between moving abrasive grains and the floor. | Machine speed, contact pressure, abrasive condition, grain type, and dust removal all affect cutting performance. |
| Pressure and machine control | Operator pressure and equipment movement determine how evenly the abrasive cuts. | Keeping the machine moving helps prevent dips, swirl marks, heat buildup, and uneven sanding. | More pressure is not always better; it can accelerate loading, damage the backing, and produce an uneven floor. |
| Choosing between grit systems | Select the grit according to the marking printed on the abrasive and the requirements of the job. | Use the same grading system when comparing products, or consult a conversion chart supplied with the abrasive specification. | FEPA P-grades and ANSI/CAMI grades should be treated as comparable references, not guaranteed equivalents; particle distribution, backing, coating, and grain type also affect results. |
Floor sander sheets combine a flexible backing with bonded abrasive grains. These grains cut wood fibers through controlled scratching, not simple rubbing. Each grain has sharp points that slice raised fibers and flatten uneven areas. Some grains also plow through softer wood, creating heat and fine dust.
FEPA 42-1:2006 classifies coated abrasive sizes by grit designation.
Larger grains remove finish faster. Smaller grains leave shallower scratches. The scratches must overlap in a controlled sequence. Otherwise, later sanding cannot fully erase them.
The first pass is rarely elegant. On site, a coarse sheet can expose deep scratches, especially across soft springwood. Excessive pressure increases heat and can load the sheet with resin.
According to the NIOSH Pocket Guide, wood dust has a recommended exposure limit of 1 mg/m³ as an eight-hour time-weighted average. Dust extraction and suitable respiratory protection remain practical controls.
A test area is still necessary. Paper data cannot predict every floor. Moisture, timber species, grain direction, and old coatings change cutting behavior. I sometimes see operators advance too quickly. The floor looks smooth, but angled light reveals stubborn cross-grain marks.
What Are Floor Sander Sheets and How Do They Work?
Floor sander sheets are abrasive papers fixed to sanding machines or sanding blocks. Their grit number indicates particle coarseness. Lower numbers cut faster and leave deeper scratches. Higher numbers remove fewer marks and create a smoother surface.
For damaged or uneven timber, 36–40 grit usually provides the first serious cut. It removes old finish, paint residue, and shallow lipping between boards. NWFA Technical Publication C200 recommends inspecting the floor after each sanding stage. That matters because coarse scratches can remain visible beneath clear coatings. I have found that 40 grit is safer on softer boards, while 36 grit can be aggressive. Mistakes happen quickly.
The next stage normally uses 60–80 grit. A 60-grit sheet levels the previous scratches, while 80 grit refines the surface before final preparation. FEPA’s abrasive grading system identifies these as progressively finer P-grades, not interchangeable performance ratings. Use overlapping passes and keep the machine moving. Stopping briefly can create a noticeable hollow. The 100–120 grit range prepares the wood for stain or finish. It should not erase every natural texture. Excessive polishing can close the surface and reduce stain absorption. NWFA guidance also emphasizes checking lighting, board direction, and dust removal between passes. A 120-grit finish may look excellent under workshop lighting but reveal cross-grain scratches near a window. That is why experienced contractors often test a small area first.
Floor sander sheets use abrasive particles to remove coatings, scratches, and uneven wood fibers. Progressive refinement typically moves from coarse grits to finer grits: 36–40 for heavy material removal, 60–80 for smoothing, and 100–120 for final refinement.
How to read the chart: The bars show the approximate midpoint abrasive particle size for each grit range using representative FEPA P-grade values. Lower grit numbers use larger particles and cut more aggressively; higher grit numbers use smaller particles and leave a smoother surface. Always follow the flooring manufacturer’s sanding recommendations and remove visible scratches before advancing to the next grit.
What Are Floor Sander Sheets and How Do They Work?
Sheet Installation, Pressure Control, Dust Extraction, and Wear Inspection
Floor sander sheets are abrasive surfaces fitted beneath a floor sanding machine. They remove old finish, scratches, and uneven wood fibers. The sheet may attach with clamps, adhesive backing, or a hook-and-loop system. Always match its size and attachment method to the sanding plate.
A secure installation matters. The sheet should lie flat, without folded edges or trapped dust. A raised corner can leave visible marks across the floor. I check the surface by hand before starting. It takes seconds. Keep the machine moving, and use steady pressure rather than forcing it downward. Excess pressure can overheat the abrasive and create shallow dips in softer wood. Light pressure often cuts more evenly, although beginners may need practice.
Dust extraction should connect firmly before sanding begins. A clear airflow reduces airborne dust and keeps the abrasive surface cleaner. Empty the collection container before it becomes full. Inspect the hose for cracks, especially near bends. Poor extraction is not merely untidy; it can hide surface defects and affect breathing comfort.
Wear inspection should happen frequently. Look for glazed areas, torn edges, clogged grit, or uneven discoloration. Replace the sheet when sanding becomes slow or patchy. I have sometimes kept a sheet too long, thinking it still looked usable. That judgment was wrong. A fresh sheet can produce a flatter result with less machine pressure. Test a small, hidden area before continuing across the room.